I always knew what the cover should be. Pretty much as soon as I had the idea to include the fossil in the story, it seemed obvious that it would make a great cover image. Actually, my initial idea was a take on the Jurassic Park logo but with wings. However, I quickly real-ised that this would be too cute and would probably get me sued so I modified it to a more realistic image of the dragon fossil. But I just knew that’s what I wanted on the cover. I didn’t have a specific idea of what it would look like or how it would be achieved. And back in those days of looking for a publisher, I assumed that they’d probably ignore my ideas anyway and, even if they did listen, a professional artist would have to worry about how to actually make the thing.
And then the world changed and I became my own publisher. Now I had to make the damned thing myself.
This wasn’t quite the headache it might have been. I studied art at school and came close to applying for a graphic design course so I knew I’d be able to produce something. But would it be good enough for a book cover? Would it stand up alongside professionally published books without screaming “I’m the self-published one!” And how was I actually going to make a dragon fossil? It’s not as if there are any lying around in the real world that I could get photos of.
I ruled out painting or drawing straight away. My style of art doesn’t lend itself to things like fossils and I didn’t think I’d produce something I’d be happy with. I found a website called parentchildeducation.com that showed how to make fossils and hide them in the garden for children to find. (And now I’m wishing I’d thought to hide a fossil somewhere and leave clues to its whereabouts as a promotional campaign a la Kit Williams...) They did it with -
Before I tell you, what do you think it’s made out of? Go on, have a guess without reading any further. I’ll be surprised if anyone gets it. Plaster of Paris do I hear you say? Cement? Papier-mâché? Not even close.
The website said to roll out a thick layer of play-Doh in a tray, then make a fossil impression in it using either a stencil or...well, I’ll keep you guessing for now. They then covered it in plaster of Paris. Once it had set, they turned it over, peeled off the Play-Doh and were left with a 3D bas-relief fossil. Simple enough although I’d never worked with plaster before and knew that it has a risk of exploding. Still, nothing ventured. The bigger problem was the Play-Doh. My fossil would need to be quite large to be of high enough quality and that much Play-Doh is just too expensive. Luckily, the website had thought of that: make your own! They had three handy recipes for homemade Play-Doh...which turned out to be just recipes for dough, which isn’t remotely the same consistency but never mind.
So I ordered a big bag of plaster plus some coloured sand so that the fossil wouldn’t be white, all the necessary equipment (mask, glue, bomb shelter), bought lots of flour and a big container and set about mixing dough.
I should at this stage point out that I’m not a baker and this, therefore, is not how I made the fossil. My first batch of dough turned out well enough until I tried to make an impression. It just sprang back into place. This wasn’t going to work but I did discover something interesting. The dough looked surprisingly like rock. It had colour and texture and looked for all the world like a slightly wet cave wall. I didn’t need the plaster or sand that I’d spent money on. I just needed better dough. What’s more, the impression looked just as good sunk into the rock as standing out from it.
So, having failed with my dough, I needed something else. And I came up with...more dough! If the first batch had been too springy then maybe wetter dough would work. It didn’t. It just dribbled. I needed something like dough but which I could make a firm and permanent impression in.
And then inspiration struck.
Worked it out yet? Last chance cos I’m about to tell you and no-one’ll believe you if you say you knew all along.
Pastry! A dinosaur made of pastry. Told you you’d never guess. No you didn’t, stop lying at the back. Not home-made pastry, of course, but the ready-made stuff that you can buy in blocks. I bought 6 kilos, rolled it out and blended it together to make a single thick sheet and then made my impression.
Oh yes, I haven’t told you what I used to make the impression. Have you sussed that out yet? I didn’t use a stencil or draw it into the pas-try by hand. There was a much better method. I used chicken bones. A dinosaur made of pastry and chicken. A dinosaur made of chicken pie. Who’d have guessed? Not you anyway. No, no-one believes you.

I had to make some compromises. I’d always imagined the fossil in a traditional dragon shape. You know, long rather than tall. And that’s how it’s described in the book, so that when you stand at one end you can’t see the other. But a book cover’s tall, not long, and to make the fossil the correct shape it would have to be relatively small and only take up roughly a quarter of the cover rather than the three quar-ters needed to fill the space leaving room for the title. So my fossil had to stand upright although I still gave it a long neck and tail. And the head took a little bit of sculpting on my part because chicken bones don’t include any that look like a dragon’s head. Even upright, I was struggling to fit everything in, which accounts for the tail tripping the dragon up and its nose being too close to the edge and, as a result, being cut off in most print copies.
When I’d made my first two doughy attempts, I’d hung on to them to show Phil Scary (who would be photographing the finished effort) the results. Despite being kept in a reasonably airtight container, they’d gone mouldy very quickly. Worried that the pastry would do the same I made it and then phoned Phil at the last minute and asked him to bring his camera. Of course, if I’d had the sense to give him notice then the thing might have been fully charged. Instead we were fighting the time trying to get some decent pictures before the camera died on us. We were worried that none of the ones we did get would be usable and the pastry would go mouldy before we had a chance to try again. (It didn’t - and still hasn’t all these weeks later.)
When I’d made my first two doughy attempts, I’d hung on to them to show Phil Scary (who would be photographing the finished effort) the results. Despite being kept in a reasonably airtight container, they’d gone mouldy very quickly. Worried that the pastry would do the same I made it and then phoned Phil at the last minute and asked him to bring his camera. Of course, if I’d had the sense to give him notice then the thing might have been fully charged. Instead we were fighting the time trying to get some decent pictures before the camera died on us. We were worried that none of the ones we did get would be usable and the pastry would go mouldy before we had a chance to try again. (It didn’t - and still hasn’t all these weeks later.)
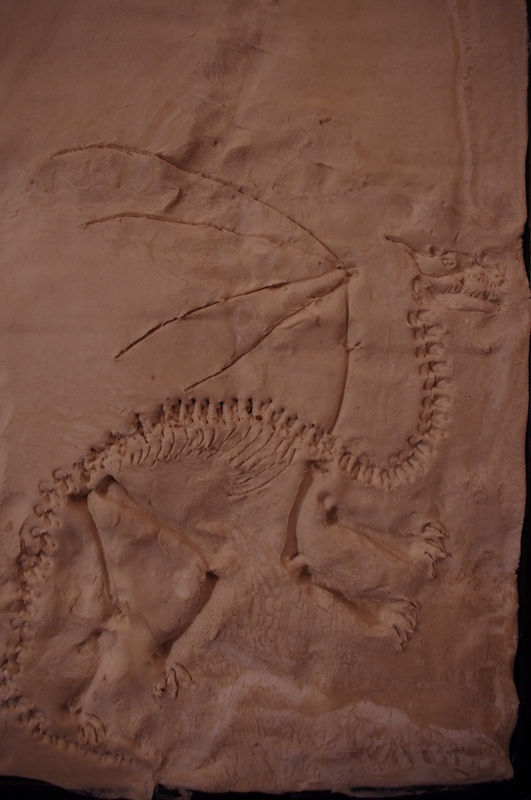
Our initial efforts showed the fossil quite well but lacked any dynamism. They were good pictures of what I’d made but they weren’t a book cover. Phil wanted to mess around with the lighting but, because of my last minute call, hadn’t been able to bring any lights with him. So that wonderful lighting effect was achieved by me standing just off camera holding a table lamp. Pastry, chicken bones and a table lamp.
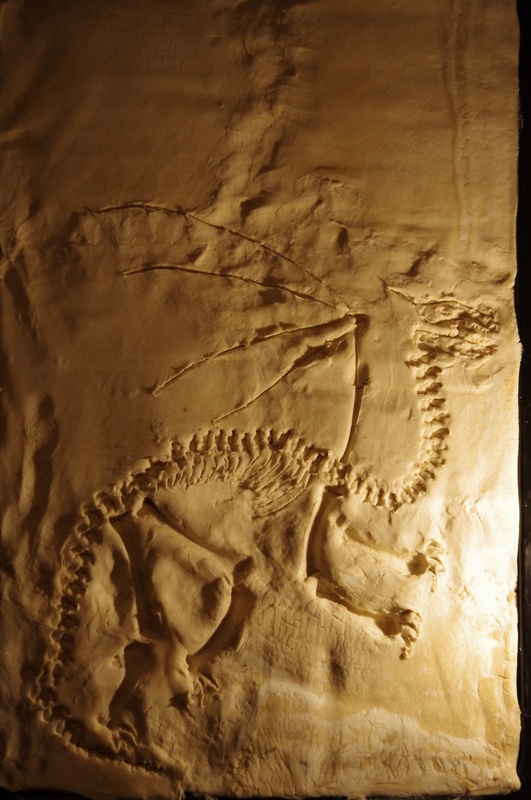
It was only when we saw the photos in a decent size on a computer screen that we realised they’d come out much better than we’d hoped. One in particular stood out. The light transformed it comp-letely and almost made it look like someone had just discovered it and was holding up a, well, a light to get a better look. Add a title and the author’s name and we had a cover that we could be proud of. The idea that I’d had in my head all those years could now sit comfortably alongside professionally published books and hold its head up high.
Even if its nose was cut off.
Next time: What Do You Believe?
Even if its nose was cut off.
Next time: What Do You Believe?
 RSS Feed